EXPOSURE
METERING | BRACKETING | LIGHT SOURCES | EXPOSURE CONTROL | STOPS | SHUTTER | APERTURE | GRAPHS
METERING
Most films are calibrated to be exposed correctly as metered against a Gray Card, which reflects 18% of continuous available light, or 18% of the light from a Strobe. The Camera's internal Light Meter, or a separate Spot Meter, can produce an accurate reading from the Gray Card, or a relatively accurate reading from another middle value. Other metering devices, such as a Strobe Meter or Flash Meter, are calibrated to variable film speeds and can provide information for making accurate exposures. Some Spot Meters can also read the quick burst of light provided by a Flash or Strobe. These Spot Meters are also calibrated to read the 18% of light reflected from Middle Gray or similar value. Spot Meters are used to produce the most accurate readings, but they are also most prone to user error.
The Gray Card is a universal standard that virtually all Camera and Film manufacturers calibrate meters and exposure index for. Understanding use of the Gray Card and knowing your camera's metering system are critical to making accurate exposures.
 |
 |
 |
||
Nearly 100% |
Reflects 18% |
Nearly 0% |
All surfaces reflect light. Meters that measure reflected light depend on the user to measure an area that is Middle Gray, or a surface that reflects the equivalent of the 18% of light reflected by a Gray Card. The reflectivity of white is nearly 100%, whereas the reflectivity of black is approaching 0%. The meter assumes they are the same. If the user meters on white, the camera will underexpose and render the value as middle gray. If the user meters on black, the camera will overexpose and render the value as middle gray. The camera operator should compensate for metering done under conditions where surfaces reflect a minimum or maximum amount of light, especially if no middle value or Gray Card is available to help make a more accurate reading. In a snow or white sand environment, the operator should increase the expose by approximately two stops, or even a little more, to render the higher reflectivity more accurately as near-white. Conversely, if a scene predominantly contains dark paint or dark cloth, the operator should decrease the expose by approximately two stops to render the lower reflectivity more accurately.
Meters that measure incidental light from the source give the user a measurement for the amount of light provided, but they do not measure reflected light (unless the reflected light is part of the light source). These meters are held in the scene, in front of the camera, and are pointed at the camera, in most cases, to measure the amount of light that will reflect into the lens.
The Camera's internal Light Meter is "weighted." This means that is makes its reading based on a portion of the frame. The user should read the Camera User's Manual to understand what portion of the frame is reading reflected light. This is necessary to control the meter and make determinations about the values you read with the camera. Additionally, many modern Cameras allow the user to adjust the meter's area of sensitivity, making it possible to measure a small spot or change the metering with the change of the focus sensors.
Making accurate measurements with a Light Meter is a very important first step, but advanced photographers make additional determinations about their exposures. Adjustments may take into account constants, such as film contrast or saturation.
Different surfaces, even of the same color (i.e. green cloth, green plant, green illustration board) reflect different percentages of light. Compensation for increased or decreased reflectivity of certain surfaces is most easily accomplished in a fully controlled environment using Strobes.
Most creative control is accomplished by controlling contrast with light sources and adjusting the exposure to enhance Highlights, Penumbra (transition) or Shadow.
BRACKETING
Often the first thing students learn is to make an exposure according to their Camera Light Meter and then to "bracket" the exposure. This is a guesswork method where to goal is to make a range of Negatives with different densities. One of the Negatives will hopefully produce an excellent Print. A simple representation of a Gray Card exposed according to the Meter Reading and then overexposed one Stop and underexposed one Stop is shown below.
 |
|
 |
||
+1 Stop |
on Meter Reading |
-1 Stop |
Learning how to make the Meter Reading is extremely important. The conventional form of Bracketing simply tries to correct for poor Meter Reading or poor processing of Negatives, where they may be too dense or too thin.
Seeing the changes, or transition of light, in a scene is necessary to make Meter Readings. If a Meter Reading were the same at all points in the frame, the resulting Photograph would seem flat and shapeless. Varying light, stronger and weaker, highlights and shadows are what give the two dimensional photograph the appearance of depth and shape. As a Photographer, you want to decide which intensity of the light you are exposing for. You may then Bracket the Meter Reading in several ways:
Once you have read the light for a "normal" exposure in the bright portion of the frame, try overexposing the image by an additional 1/2 Stop, 1 Stop and possibly even 1 1/2 Stops. By making these kinds of decisions, you are controlling the results of your expose -- deciding to make highlights or bright surfaces brighter, or deciding to make dramatic shadows or silhouettes of dark shapes.
LIGHT SOURCES
Different light sources have different intensities. The sun is the standard and among the strongest continuous lights sources we use. Most films are balanced to Daylight.
There are many light sources which are significantly weaker than the sun, including candle flame and moonlight (the small amount of sunlight that is reflected from the moon in the night sky).
Lights are strongest close to the source and weaken as you move away from the source. Inefficient sources burning organic matter, such as candles, fall off the most in intensity, while an efficient source, such as a laser, will maintain the best consistency as it is measured away from the source. A strobe, a light source with a very short duration, will measure strongest close to the Flash Tube and will weaken with distance until it will not register on the scale of the Flash Meter.
Light sources are characterized by various temperatures, or colors. The sun, as well as most strobes, when using films balanced to daylight and not being affected by extraneous light sources, will render white as white and will only be affected by the Film Base. Florescent lights may render white with a green cast and incandescent light has a yellow cast.
The sun has a continuous intensity. When the sun is more than 20 degrees above the horizon, and unaffected by clouds or haze, it will measure consistently. Most consider the Basic Daylight Exposure to be 1/125 of a second Shutter Speed with an Aperture setting of f16 when using 100 Speed Film. Because the sun as a light source is in different positions in the sky at different times of day, the metering process may produce different results. When the unobstructed sun is behind you and you meter perpendicular to the light source, the Basic Daylight Exposure, 1/125 at f16 with 100 speed film, is a reliable measurement to begin making exposures.
You may make adjustments to the Basic Daylight Exposure, as shown below in
More characteristics of light sources:
- Sunlight (The sun affected by clouds may require exposure compensation of +2 to +3 Stops.)
- Shaded Daylight (Sunlight, when available in shade, tends to render a blue cast, which can be improved using a Warming Filter, 81A or 81B.)
- Florescent (There are different balances of fluorescent light, including the ugly green cast seen in many Machine Prints. We usually only see this affect in pictures because our eye adjusts for the discoloration in Fluorescent environments.)
- Incandescent (Most household light bulbs are week incandescent lights producing a yellow cast.)
- Candle Light (This flickering light source records yellow to orange on film. Because candle light is a week light source requiring long exposure, its movement produces deceptively unsharp transition from light to shadow, often combined with Camera or subject movement, to produce softly focused images.)
- Quartz or Halogen (These sources are usually more clean, less yellow, and a little stronger than Incandescent light.)
- Neon (Neon lights often appear overexposed, or nearly white, on film because exposures are often lengthened to better expose the overall scene. Combining light sources, such as weak Daylight or additional Strobes, can help produce richer color in the neon tubes.)
- TV (Television light is typically blue, but changes with the pictures it emits.)
- Auto Headlights (Different headlights produce different results, from slightly cool to warm. Headlights are harsh point light sources. They can produce streaks of light when recorded over an increased duration of photographic time.)
- Moonlight (Moonlight is reflected sunlight and is substantially weaker than the sun. Like the sun, the light reflected from the moon may be warm yellow light when it is low on the horizon, but slightly cool as it is high in the sky.)
- Strobe (The Flash Tubes in Strobes and Flash units provide an intense light, with a short Duration. The fast burst of light, occurring in only 1/5,000th to 1/20,000th of a second, can freeze motion or fast action. If the strobes have little competition from Continuous Ambient Light Sources, which may record motion over the longer Duration of the exposure, images can be extremely sharp, from lack of recorded motion more than precise focus. Most Strobes are balanced to Daylight.)
- Lightning or Fireworks (These are bright light sources that appear more interesting as they travel. The motion can be recorded with increased time, or slower Shutter Speed, which is limited by Ambient light sources as they may record on the film, adversely "fogging" the film. The saturation of the moving light may need to be improved with a small Aperture, f11, f16 or even f22.)
- Starlight (Photographing stars requires complete darkness and long exposure. With any long exposure, Ambient light may adversely "fog" the film.)
- Flashlight (Flashlight bulbs usually produce a yellow light. Because flashlights are aimed or focused, similar to spotlights, they are an interesting light to "paint" a subject with a brushing motion.)
- Stagelights (The creative lights around stages are often covered with theater gels to produce many colors. Some colors may produce better results on film than others, because, like photographic filters, they have different density factors.)
EXPOSURE CONTROL
Photography is a product of light and time. The quantity of light allowed through the Lens is controlled by the size of the Aperture. The length of time the light is allowed to record on the film is controlled by the Shutter or Shutter Speed. Variables include Film Speed, which indicates the film sensitivity to light, and filters, which may reduce the amount of light allowed to reach the film.
STOPS
A Stop, a short term for f-stop, refers to the measurements on the camera dials or adjustments for the Aperture and Shutter, and can also be applied to the Film Speed. Changing the Aperture from f11 to f16 is an adjustment of One Stop. Changing the Shutter Speed from 250 to 125 is an adjustment of One Stop. Asking for film to be processed as 200 instead of100 is an adjustment of One Stop.
Stops are equal units that can be divided or multiplied by two. If 1/125 (Shutter Speed) at f16 (Aperture) is an accurate meter reading, then changing the Shutter Speed to 1/250 (reducing the time of the exposure by 1/2) and changing the Aperture to f11 instead of f16 (doubling the amount of light allowed through the lens) will record the same amount of light.
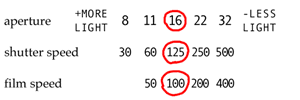 | 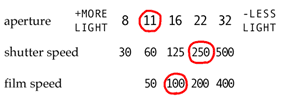 |
| Basic Daylight Exposure | Aperture +1 Stop, Shutter -1 Stop |
If you know 1/125 (Shutter Speed) at f16 (Aperture) is an accurate meter reading when using a Film Speed of 100, then changing to a Film Speed of 50 will require you to double the amount of light in the Aperture or Shutter Speed to record the same amount of light. The Aperture will need to be set at f11, or the Shutter Speed will need to be set at 1/60.
|
| 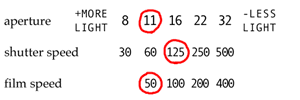 |
| Basic Daylight Exposure for 100 Speed Film | +1 Stop Adjustment for Slower Film |
Practice making adjustments to the Aperture and Shutter with these Exercises.
See a graph that represents equal adjustment to the
SHUTTER
The Shutter Speed may operate extremely fast, 1/4,000th of a second, but may also be extended to open for a very long period of time. Many consumer Cameras Shutter Speeds range from 1/4000 to 30 seconds ("), providing a range of 17 stops.
The Shutter Speed is measured in full seconds or fractions of a second. The commonly used settings, 60, 125, 250, 500, are fractions of a second -- 1/60, 1/125, 1/250, 1/500. Full seconds, such as 1, 2, 4 and 8, are usually indicated with a different color, or by showing a seconds indicator (") in the LCD.
APERTURE
The Aperture is the resizable opening in the lens that determines the amount of light reaching the film. Large openings, f-stop settings such as 1.8 and 2.8, allow more light to reach the film than small openings, f-stop settings such as 16 and 22. Large openings create shallow Depth of Field, or a short range of sharp focus, while small openings can be used to record a maximum range of sharp focus, or a greater Depth of Field. See a representation of
The Aperture has a more limited range than the Shutter Speed. Common f-stop settings on the lens are 1.8, 2.8, 4, 5.6, 8, 11, 16, 22, 32, making a range of nine Stops. Many Camera Lenses only range from 5.6 to 22, making the range only five Stops.
Use the graphs below to understand the relationship of the Shutter and Aperture.
GRAPHS
The Shutter Speed is the time of the exposure.
Graph: Shutter Speed
The photograph is a product of light and time. The Aperture is used in conjunction with the Shutter to determine the amount of light that will record on the film.
Graph: Shutter Speed and Aperture
Many exposures intentionally or unintentionally combine different light sources of varying intensities and timing. It is important to know how to measure and combine the sources accurately, or at least predict and understand the results.
Combining Light Sources
Making Adjustments:
Use the following exercise to make conscious decisions about the combination of Aperture and Shutter Speed, as well as Film Speed, that will work best in different situations.
Aperture and Shutter Adjustment Exercises
Use the following link for a printer-friendly page:
Aperture and Shutter Adjustment Practice
HIFC FIELD GUIDE | PHOTOGRAPHY CLASSES | info@houstonculture.org
Updated Oct. 2001